Photographing the Wildebeest River Crossing
Understanding the Crossing Event Photographically
What Makes the Crossing Photographically Unique
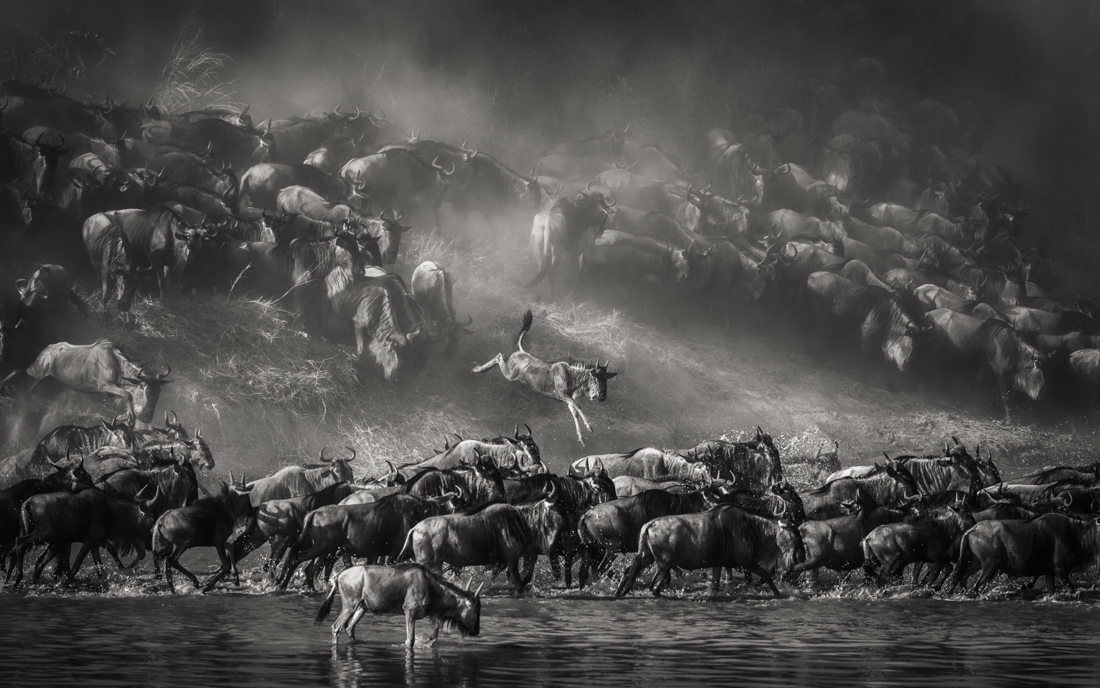
The Mara River wildebeest crossing represents one of wildlife photography’s most technically demanding and emotionally overwhelming subjects simultaneously — a chaotic, dust-filled, acoustically thunderous event lasting anywhere from three minutes to three hours that produces thousands of potential frames per minute but demands very specific technical preparation and positioning to convert that volume of opportunity into high-quality images. The crossing’s visual complexity — hundreds of animals in the frame simultaneously, motion at multiple speeds and directions, water splashing across the entire image, dust rising from the entry point — creates a scene that the human eye processes as magnificent spectacle but that the camera must be configured specifically to render as a photograph rather than a motion blur of indistinct brown shapes in a tan cloud. Preparation before the crossing begins is the difference between returning with publishable images and returning with interesting memories.
The most impactful crossing photographs capture a single decisive moment within the crossing’s chaos — a wildebeest leaping off the entry bank at the apex of its trajectory, a crocodile striking from the water with its jaws open, an animal climbing the exit bank with its legs churning and nostrils flared, a sea of horns and heads stretching to the bank. These single-image moments require fast shutter speeds to freeze movement, accurate autofocus to nail the nearest subject, and burst shooting to capture the peak of the action within the sequence. Photographers who attempt to compose carefully during a crossing typically miss the decisive moments entirely — the crossing works at a pace that rewards preparedness and reactive shooting over deliberate composition, with editing imposing the compositional choices after the fact from the sequence of frames the burst captured.
Positioning for the Best Crossing Photographs
Vehicle positioning at a Mara River crossing point determines the photographic quality of the images more than almost any technical camera decision, because the angle between the photographer and the crossing animals determines whether wildebeest appear in profile — the most impactful and informative angle — or head-on and foreshortened in a way that compresses the visual impact of the crossing’s scale. The best crossing photography positions place the vehicle at 45 to 90 degrees from the crossing direction so that the procession of animals moves across the frame rather than toward or away from it. Guides at the main crossing points know which specific positions deliver the strongest crossing angles and drive to these positions well before the crossing begins rather than adjusting reactively once the first animals enter the water.
Height above the water level affects the perspective and background relationship in crossing images. Low-bank positions that place the camera at near-water level produce dramatic images where splashing animals fill the frame against the river’s surface behind them rather than against a muddy bank that flattens the visual environment. High-bank positions allow wide-angle compositions that capture the full scale of the crossing from entry to exit, showing the entire procession rather than tight subjects. Both perspectives serve different photographic purposes — close, low, and tight images communicate the crossing’s intensity and the individual animal’s physical effort, while wide, high, and contextual images communicate its scale and its relationship to the broader landscape. Bringing lens choices that cover both possibilities — a 400mm telephoto for close work and a 70–200mm for contextual shots — within a single lens transition across the crossing allows both types of images to emerge from the same event.
Camera Settings for Crossing Photography
Shutter Speed, Burst Rate and Autofocus Configuration
Shutter speed for crossing photography begins at 1/2000 second as the minimum for freezing a leaping wildebeest in mid-air without motion blur in the legs and head — the body may be acceptably sharp at lower speeds but the outstretched legs that define the leaping silhouette require the higher minimum. A shutter speed of 1/3200 or 1/4000 second provides a margin that handles the fastest movements within the crossing — a panicking animal that changes direction suddenly, a crocodile lunge, the water splash that extends faster than the animal producing it — without requiring precise calculation at the decisive moment. Setting the camera in shutter priority mode with auto ISO allows maintaining this minimum across the rapidly changing light conditions of a dawn crossing as the sun rises behind clouds that thin and thicken unpredictably.
Burst rate should be set to the camera’s maximum — typically 15 to 30 frames per second on modern mirrorless systems — during the crossing’s most active phases because the decisive moment of a leap, a crocodile strike, or an animal falling and recovering often occupies a single frame within a ten-frame sequence that looks almost identical. The camera’s buffer size limits how long a maximum burst can continue before write speed to the memory card creates a pause — knowing your camera’s buffer limit in advance and managing burst length during less critical moments to preserve buffer capacity for the peak action phases represents the kind of technical preparation that converts crossing attendance into crossing images. Continuous autofocus in animal tracking mode, with eye or body detection enabled, keeps the nearest prominent animal’s eye as the primary focus point through rapid lateral movement within the frame in ways that manual focus point selection cannot track at crossing speed.
Managing Dust, Water and Light
Dust at the crossing entry point rises within seconds of the first animals entering and can fill the air at crossing concentrations to the point where images taken into the dust cloud lose contrast and colour saturation that no amount of post-processing restores. Positioning the vehicle so that the dust cloud remains behind the primary subjects rather than between the lens and the subjects — which requires the vehicle to be slightly upwind or lateral to the main dust source — produces cleaner images from the same crossing event. Crossing entry banks that face south or southeast allow morning crossings to be photographed with the sun angle behind and to the side of the photographer rather than directly against it, which produces lit subjects against a darker background rather than silhouettes against a bright sky.
Water spray from crossing animals hitting the lens requires either a UV filter that takes the spray instead of the front element or a lens hood extended enough to deflect the splash before it reaches the glass. The immediate post-spray window — before the filter or element dries — produces soft images that look like they were shot through frosted glass, and the habit of checking and blotting the lens between bursts during a crossing prevents a sustained spray event from ruining an extended sequence. Lens cloths kept accessible in a chest pocket rather than in a bag allow quick access during the active phases of a crossing without the movement that searching in a bag produces at the precise moment the action escalates.
Planning Your Crossing Photography Session
Timing, Camp Selection and Practical Preparation
When Crossings Happen and How to Find Them
Wildebeest river crossings in the Maasai Mara occur most frequently in the morning hours between 07:00 and 12:00 when the animals are most active after overnight grazing and when the temperature is still cool enough for extended physical exertion without the thermal stress of midday heat. Afternoon crossings occur but are less predictable, and the lower sun angle of late afternoon produces more complex backlighting situations at most crossing points that require different exposure handling than the cleaner front-light of the morning. Guides monitoring crossing points via radio networks from other vehicles and camp intelligence know which specific points have animals massing on the bank and can reach active crossing sites before the first animals enter the water in most cases where the crossing develops over an hour or more rather than erupting suddenly.
Spending three to four days in a single camp positioned near the river’s main crossing points rather than moving between camps during the crossing season allows the guide relationship and crossing-point knowledge to compound daily. First day familiarises the guide with the photographer’s equipment, preferred positions, and subject priorities. Second day applies this knowledge with the guide making positioning decisions proactively rather than reactively. Third and fourth days build the accumulated intelligence about which animals are massing where, which crossing points are most active in the current week, and which specific moments within the crossing produce the images that match the photographer’s vision. This compounding value of extended stay distinguishes serious crossing photography itineraries from brief visits that attend one or two crossings and depart before the knowledge accumulation can translate into better images.
Plan Your Safari
Photographing wildebeest river crossings effectively requires migration-season timing, river-adjacent camp selection, guides with crossing-point experience, and the patience to wait through multiple build-up sequences before a full crossing develops. African Wild Trekkers designs crossing photography itineraries that combine all these elements, positioning guests in the best camps with the most experienced crossing guides for their specific travel dates.
The package covers accommodation at river-positioned camps during peak crossing season, morning crossing point drives timed for maximum crossing probability, park and conservancy fees, internal flights, and specialist photographic guide briefings on crossing photography technique and positioning. Pre-trip equipment advice for crossing photography is provided before departure.
Contact African Wild Trekkers at africanwildtrekkers.com/contact with your crossing photography goals and travel dates and we will design your Maasai Mara photography safari within 24 hours.